Anchoring on Barren River Lake by Lee Huddleston

If you are sailing on a hot day and decide to go for a swim, do one of two things: leave at least one adult on board while everyone else is swimming, or anchor the boat. If everyone gets into the water without dropping the anchor, you can be surprised at how fast a boat can drift away from you in the calmest wind. Even if you survive, it is quite embarrassing to have to flag down a motorboat to help you chase down your boat.

In some places, the Lake is surprisingly deep. Right off the Yacht Club Cove, at summer pool the Lake is 70 feet deep. The old river channel runs right through that area. Farther out from the Cove the Lake averages 50 feet at summer pool. When travelling between the Peninsula and Mason’s Island with a depth finder, it is fascinating to watch the depth get progressively shallower until it is about 15 to 20 feet. Then suddenly the depth will jump to 65 feet. That was a cliff that overlooked the old river channel.

The point is, the depth can cause problems in anchoring. As you know, “scope” is the ratio of the anchor rode let out to the depth of the water (and the height of your bow above the water). The normal recommended ratio is 7 to one. In other words, 7 feet of rode for every one foot of depth. The reason for that ratio is to make the anchor lie flat along the Lake bed so that when it is pulled it will dig into the bed. With 70 feet of depth or even 50, that scope is not practical. Few of us want to carry 490 or 350 feet of rode. Nor do we want to swing in a huge circle.

So, is it possible to anchor in the middle of the Lake? Yes, it definitely is. On a regular basis I anchor Orion in the middle of the Lake and only use about 100 feet of rode. One reason is that I don’t often anchor in the middle when I anticipate a very strong wind. Another reason is my ground tackle (anchor, chain and rode).

I have anchored Orion more than two times in winds exceeding 60 knots. Once just last year. Many years ago I saw a storm coming over the Dam and got in behind the eastern side of Mason’s Island (toward Bailey’s Point). I put the bow up close to the Island and dropped the anchor into the old river channel. When the wind pushed me back, the anchor dug into the relatively vertical eastern side of the channel. It was exciting (I’ll have to tell you the whole story at a later time). The other time was just last year. Nicole and I were just day-sailing and ignoring the warnings of remnants of a 90 knot storm in Indiana. We came around the southern end of Mason’s Island and there was the big, black, monster coming over the Dam. (Maybe the Dam just generates these storms.) I could see a whole herd of white horses bearing down on us. I told Nicole to go below and hold on. I then headed up and dropped the anchor and fell back on all of my 150 feet or rode. I then quickly got my sails down and secured (barely in time). The wind and rain hit like a full-force fire hose. In the short fetch between the Dam and our location the storm had kicked up waves about 3 feet high. I was proud that the ground tackle held us as if we were glued to the ground. The only problem was that I have needed to replace the port lights in my windows. As a result, we sat there laughing while the rain poured in on us. After the storm it took a lot of patience to get the anchor back on board. It had dug half way to China. I pulled up the rode and snugged it to the bow and then waited for the wave action to slowly work the anchor free. With repeated pulling and snugging the anchor finally broke free. When I tried to pull it up to the boat, it was a gigantic ball of mud, rock, and gravel. But after a few minutes of dunking it I was able to get it clean.

When I first started sailing Orion I purchased a 13 pound high-tensile Danforth anchor from West Marine. It has worked exceptionally well. You will recall that a Danforth anchor has a shank in the middle and triangular “flukes” on each side of the shank. When the anchor is on the bottom the flukes drop down somewhat. As the anchor is pulled by the shank the flukes dig into the bottom. The more the anchor is pulled, the deeper the flukes dig (which is why I got such a huge ball of Lake bottom in the last storm). If the anchor is not lying flat, the flukes can flip up and the anchor will just drag across the bottom. There are many types of anchors (Bruce, claw, Delta, CQR, plow) all of which can work well in the Lake.

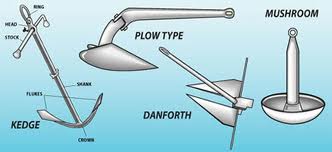
Anchors do not hold due to their weight. They hold by digging into the bottom. And they dig into the bottom because of their shape. Accordingly a mushroom anchor or any variation of it is completely worthless. To be held by weight alone you would probably need to get an old engine block.

After the anchor, you need to get a chain to go between the rode and the shank. On Orion I have a 6-foot length of 5/16 inch chain. That is a relatively heavy chain on purpose. A light chain will not accomplish the purpose. And that purpose is to help keep the shank along the bottom when the rode is pulled. The difference between an anchor without a chain and one with a chain is dramatic. Any old rusty chain will do, the longer the better.

When I first started sailing Orion, I wanted to get the best for her. So for my rode I purchased 100 feet of ½ inch braid-on-braid Dacron line. Bad idea. When I sailed with Karl Millen in the Bahamas on his much larger cruiser, the Succubus, I noticed that his rode was smaller than the one I had purchased for Orion. When I asked him about it he pointed out that the breaking strength of his smaller rode was strong enough to lift his boat out of the water. He also pointed out that a smaller, twisted (rather than braid-on-braid), nylon line would stretch and absorb the jerks from waves that can pull an anchor free. So, I purchased 150 feet of twisted, nylon, 3/8 inch line. Since then my anchor has held much better even in the strongest winds.

One more technique that I have used on Orion occasionally and almost every time on the Committee Boat when I am running races can multiply the holding power of your anchor many fold. It is called a “sentinel” or a “kellet.” It is a weight that you run down your rode after you have set your anchor. On the Committee Boat I just use a concrete block. I run a line through the holes in the block and then around the rode. I tie another line on the block and secure the tail to the boat. I then push the block over the bow and slowly lower it with the added line. I lower it until it is about at the depth of the water and then I tie it off. At first the line from the block to the boat will be vertical. The line from the block to the anchor will be horizontal along the bottom. If the wind picks up and the boat tries to move aft, the rode will try to straighten out. To do that it will have to lift the block. As it does so, the force will be transferred to the anchor horizontally along the bottom, digging the anchor in deeper. Plus, due to physics beyond the scope of this article, the force necessary to raise the block is exponentially greater than the mere weight of the block.

I hope this has been useful to you. See you on the Lake.

Lee


Heading Up by Lee Huddleston

In last month’s Good Old Boat magazine the editors did a review of the O’Day 25. And, yes, they really did contact me to get my opinions. Most of the comments in the article were fair and accurate. They rated the O’Day pretty highly except for one deficiency according to their experience. They found that the boat they were testing had trouble pointing up into the wind as much as they would have liked. That was definitely contrary to what I told them. I explained that I had been racing my O’Day for over 37 years and winning numerous club races and a few Club Championships and regattas (including my class in the Kentucky 100). One of the factors that enabled me to win those races was the ability to point my O’Day higher than most other cruisers against whom I was sailing. So, it is time to share my secrets with you.

One of the “go fast” items that I added to Orion was an adjustable backstay. Orion is a “mast-head rig,” that is, both the forestay and the backstay go straight to the head of the mast. (Many other designs are fractional rigs, where the forestay only goes about 3/5 of the way up the mast.) With Orion’s mast-head rig, if I tighten the backstay, it tightens the forestay. When you look at Orion you will notice a block and tackle system between the stay and the stern. That allows me to put a lot of pressure on the backstay, which, in turn tightens the forestay “piano wire tight.” Without pressure on the backstay, the forestay will sag and curve to leeward. Sometimes you will want it to be tight and sometimes curved.

When the forestay is tight, the luff of the foresail is like a knife. It makes it possible to point up much closer than you ever have before. There is one warning, however, the “knife blade” is not forgiving. You have to pay attention to the luff at all times. One second you will be doing fine, and the next second you will be headed. But for those with a good attention span, a “knife blade” can put you way ahead.

Why would you ever want a more rounded luff? Sometimes watching the luff like a hawk can wear you out and require more effort than you want to dedicate to beating to windward. Another reason is that a slightly more rounded luff can still point without being so sensitive. There is a wider window where the boat is still sailing. Third, remember that curves equal power. If you are beating to windward against waves or a chop, a slightly rounder luff will help you power through the resistance. And finally, when you round the weather mark and head back down wind you will want the luff as loose as you can get it.

Couldn’t you just tighten the halyard? First of all, the halyard should already be tight enough to eliminate any horizontal wrinkles in the luff but not so tight as to produce vertical wrinkles. Yes, it would help, but most sailors don’t think to tighten and loosen their halyard on different points of sail. And you usually cannot tighten the halyard nearly as much as a backstay adjuster without producing a lot of wrinkles.

What if you have a fractional rig such as a San Juan 21? You are in luck, the rig us designed to tighten the forestay automatically when you beat to windward. The rig is initially set up with the forestay being slightly loose. When the boat heads up to beat to windward, you will naturally bring the boom to the centerline and haul in on the mainsheet. As you pull down on the sail with the sheet, it pulls the top of the mast aft which helps tighten up the forestay (or so they tell me)

What other things can you do to help yourself point higher? Adjust the athwart ship location of the fairlead (I dealt with the fore and aft adjustment in my last article). Also pull the foresail in tighter. Ideally, the foot of the foresail should run along the top of the gunwale. I often see sailors racing with their foresail way out from the boat. When I race Orion and use my working jib, I run the sheets between the shrouds so that when I have it pulled in tight, the sail is much closer to the main. When I use the genoa, the fairlead is all the way aft of the cockpit. I tighten it until the sail “kisses up against” the spreader arm. Just don’t go too far and punch a hole in your sail. I admit that it takes a lot of cranking on my big winches to bring the sail in this far if I haven’t brought it in before getting fully on the new tact.

As with all of my advice, this is just a way to do things; not the way. See you on the Lake. Lee


Shifting Gears with Your Foresail by Lee Huddleston

The only thing on Barren River Lake that is consistent is change. Wind speed and wind direction fluctuate throughout most days of sailing. If you hoist a foresail that is perfect for 5 knots of wind, you probably will not be too surprised it the wind increases to 7 knots and then drops off to 3 knots. And the foresail you have chosen may be completely inappropriate for both 7 knots and 3 knots. If you have a large inventory of sails, you might stop and change sails and then stop again and change to another sail. Of course, most of us do not have the luxury of such an inventory. And if you are just day-sailing, who wants to keep fooling with sails.

If you are racing, you almost certainly do not want to stop and change sails. Even on a long course, stopping to change sails is usually fatal. So what do you do if you are beating to windward and the wind is too strong for your foresail and your boat is having a hard time staying upright? Even if you could instantly switch to a smaller sail, as soon as you round the weather mark and start running or reaching, you are going to wish you still had that larger sail up. The answer to your dilemma is to “shift a gears” with your foresail.

The key is the fairlead, the block or pad-eye through which the sheet goes before it is cleated or turned around the winch.  Normally, you set the fore and aft position of the fairlead by sighting along the seam in the middle of the foresail. The seam will run from approximately midway along the luff to the clew. If your fairlead is located along the line as though the seam extended aft pass the clew, your foresail should be set properly. When the sail breaks it should bread along the entire luff at the same time. If the sail breaks at the top first, the fairlead may be too far aft. If it breaks at the bottom first, the fairlead may be too far forward. (I hope that I have that correct; if I have gotten them mixed up, you have permission to laugh at me.) Unless you are intentionally “shifting gears” (as I will explain below), you need to move the fairlead to correct this problem. Otherwise, it will prevent you from pointing as high and will depower your sail unintentionally.

So, assuming for now that your telltales normally break at the same time all along your luff, here is how you “shift gears.” If the sail is too large for the amount of wind, move the fairlead aft. This will tighten up the foot of the sail and, more importantly, open up the leach. When a puff hits the sail, it will open up and let that heavy air escape out the back of the sail. It will depower the sail some, but you already have too much power.

What if the wind is too light? To some extent you can increase the sail’s power by moving the fairlead forward. Then when you bring in the sheet, you will be tightening the leach and loosening the foot. In other words, you will be making the sail more like a cup. And as you will recall, curves are power.

I can sense some of you thinking, “But I do not have tracks or movable fairleads.” If that is your situation, you can devise a system sometimes referred to as “barber haulers.” The sheet is run through a loose block (or even just the loop of a line). Then the block or the loop is tied down forward or aft of where the fairlead normally is. In other words, you change the angle of the sheet by making your own temporary fairlead. If you find that this works to make your sailing safer and more fun, there are probably tracks and moveable blocks in your future.

See you on the water,

Lee

Boat Juice by Lee Huddleston

AN INTRODUCTION TO BOAT JUICE

By Lee Huddleston

A Beginning Point: These suggestions are meant to share with you “a” way to deal with “boat juice,” that is, electricity on your boat. They are not meant to express “the” way. You are intelligent and capable of taking these suggestions and modifying them to suit your boat and situation, or to reject them entirely.

Why Boat Juice: Lights, among other things. Not every boat needs lights. If you sail a small dingy and have no outboard, you can be “legal” by simply turning on a flashlight when approached by another boat. But, being “legal” is not the only reason to have lights. We have all seen motorboats travel across the Lake at very high rates of speed. You should give them all the help you can to see you in plenty of time to avoid running over you. You don’t want to be legal and dead.

If you want regular red and green bow lights and a white stern light, you don’t have to install a battery and wiring. All of the marine supply houses sell lights that can be temporarily attached to your boat. They are flashlights with a red/green lens and a white all-around lens. They may attach by a suction cup or a clamp. They use D-cell batteries. They cost less than $15 per light.

The Next Step Up: If your boat can handle a larger battery or you want more than just lights, let’s begin by discussing the battery. When I first started sailing Orion thirty-seven years ago (time flys when you’re having fun), I purchased a heavy 105 amp-hour deep-cycle battery. I wanted to be sure that I could operate the running lights and the interior lights for days on end and also start my 9.9 hp outboard. While the outboard also generated boat juice, I rarely ran it enough to adequately recharge the battery. This was before the advent of solar panels, so my only choice was to pull the “beast” out and take it home to recharge it. And at 105 amp-hours, it took forever to get a full charge. Lugging the huge battery around not only made me stronger, it made me smarter. I traded it in for a 34 amp-hour battery which I could carry with one hand. I could also charge it much quicker. With the 34, I never ran out of juice, so I had been lugging the beast for no good reason.

Later, solar panels became available and I installed one. Then I didn’t even have to take out the 34. For reasons I cannot recall, I switched back to a larger deep-cycle battery since the solar panel made it more practical.

For you, technology has made boat juice even easier. Up to this point the batteries I have had have been “lead-acid” batteries. They have thick lead plates that are surrounded by liquid sulfuric acid. They still have the advantage of being the cheapest type you can buy. But they have a few disadvantages. If turned on their sides, the acid can leak out and cause a lot of damage. Periodically you need to add water to the batteries because the water evaporates some when the batteries are being charged. If you don’t add water, the battery can be destroyed. And, finally, they lose some of their charge just sitting around.

Your benefit from technology has been the invention of AGM batteries. Instead of surrounding the lead with liquid acid, the plates are infused with and surrounded by a gel. You can turn them on their sides and even upside down without anything running out. They do not lose any charge just sitting around. And they take a charge faster. But, as you might expect, they are more expensive.

But you are in luck. Batteries & Bulbs, Plus on the By-Pass in Bowling Green will sell you AGM batteries in every size imaginable. And, they have a selection of “seconds” that they will sell you for half of what AGMs would normally cost. Their “seconds” are not damaged or used batteries. They just have some “blemish” which usually amounts to a missing label. I have purchased a 15 amp-hour AGM for $55 that I am going to try out on Orion for racing. It is only 5” by 3½” by 6½” tall and only weighs 11.8 pounds (compared to 55 pounds for my big lead-acid battery). This same battery or even one smaller would be perfect for most boats in the Club.

Wiring: Now that you have your battery installed securely, you will need to connect it to the light, bilge pump, or other device. If you are only going to connect to a very limited number of things, you can almost run your wires right back to the battery. Since we use direct current (DC), we have to run a wire from the positive (+) terminal on the battery to the positive side of the device and then from the negative (-) terminal on the battery to the negative side of the device. You will need some way to turn the device on and off. Sometimes that is on the device, itself, and sometimes you have to put a switch in the positive line. One other thing you should install is a fuse or circuit breaker in the positive line, as close as possible to the battery. On Orion I use circuit breakers for both the overload protection and as the switch. You can use circuit breakers made for alternating current (AC) in your DC system. You can get breakers from the marine supply houses, but you can probably get them cheaper from Lowe’s or Wal-Mart. Get the lowest amp breakers you can get and still let enough juice through to operate the device. If you want to use fuses, you can get fuse holders and fuses from any auto parts store. You can also get switches there too. The purpose of the fuse or circuit breaker is to shut off the juice if there is a short in the positive wire. Without a fuse or breaker, the short can cause your boat to catch on fire. Get extra fuses so that you are not out of business if one of them blows.

Wire Sizes and Types: Wires offer some resistance to the electrons as they pass through. You might think of it as pipes. The greater volume of fluid that tries to pass through a pipe, the more difficult it is for it to get through. The larger the pipe in relation to the volume of fluid, the easier it is for it to get through. Switching back to wires and electrons, if you try to push too many electrons through a thin wire, it will tend to block the electrons and will make the wire hot. So why should you care? Don’t try to run thin (as in 14 or 16 gage) wire for something critical like running lights. That good juice in your new battery will not get to the lights and they will be noticeably dimmer. By the way, the size of the wire increases as the gage number decreases. For Orion, all of my wiring is 10 gage (except for the wire from the battery terminals to the buss bars –more on this below). The greater the current, the lower the gage (and thicker the wire) needs to be. Also, the longer the total distance to and from the device, the lower the gage (and thicker the wire) needs to be.

Now for a “do what I suggest and not what I have done.” All of the books on marine wiring are adamant, “Do not use solid wire; use stranded wire.” The reason is that solid wire can work-harden with the vibration of a boat and become brittle. Well, I learned that little tidbit after I had wired Orion. Solid wire was just what I had. It has lasted for 37 years, but who knows; it could break any day now. Seriously, on Truelove which is intended to sail in the ocean, I would always use stranded wire.

Buss Bars: If you are going to connect more than a very few devices to your battery, you probably should use buss bars. A buss bar is a flat piece of copper about one inch wide and six inches long with holes drilled in it and usually number 10 copper screws put in those holes. There is a larger screw at one end. A relatively heavy cable is run from the positive terminal of the battery to the larger screw of one of the bars, and a relatively heavy cable is run from the negative terminal to the larger screw of the other bar. Then, rather than attaching the wires going to the devices directly to the battery terminals, those wires are attached to the appropriate buss bar. This keeps wires from getting tangled up and coming loose from the terminals. It also makes it much easier if you want to take the battery out of the boat; you only have to take two wires loose.

Splices and Rings: You can splice pieces of wire together to make longer wires. You can also attach a ring or other fixture to the end of a wire to make it easier and more secure to connect it to a device or buss bar. One major rule that even I don’t dare violate is: “Never use wire nuts (where you twist the wires together up in a plastic thimble) to join two wires or to connect a wire to a devise.” They may be acceptable on land, but they are forbidden on board boats for numerous very good reasons.

Splicing wires and attaching a ring use the same technique and supplies. For a splice, you get a small metal tube just barely large enough for the bare wire to go into. The tube is covered by plastic or some other material. There are generally three sizes for the gages we normally use. For thin wire the cover is red or pink. For the middle size the cover is blue. And for 10 and 12 gage, the cover is yellow. You start by cutting off the enough wire to expose good wire. You then trim the insulation of the wire back only about 1/8” or 3/16” and insert the bare wire into one end of the tube. It should stop half way through the tube with the insulated portion of the wire barely in the covering of the tube. You then use a crimping tool to crimp the half of the tube with the new wire in it. After that you do the same thing for the other wire on the other end. If you are attaching a ring, you will be putting wire into only one end and crimping it.

I recommend that for boats you purchase heat shrink splices and rings. Surprisingly, you can find them at some auto supply places as well as the marine supply houses. They are usually the same color as the others, but sometimes they are more translucent. Once you have both sides of a splice in and crimped, you heat the splice with a heat gun, or a lighter if you don’t have a heat gun. The coating on the splice will shrink tightly around the tube and wire giving the splice more strength and keeping water out. When I am working on Truelove, I even get heat shrink tubing slightly larger than the splice. I put a piece of the tubing on the wire and move it out of the way. After I have completed the splice, I slide the piece of tubing back down to cover the splice. I then apply heat and shrink the tubing around the splice. Just double protection.

Often people ask about using solder to join wires. The strong consensus is to use crimping instead. Like solid wire, the solder can get brittle and break. Also, if the wire gets hot, the solder can melt and let the connection go. Besides, crimping is easier to do correctly and, with heat shrink, produces a strong, weather-tight bond.

I hope this has been helpful to you.

Lee

POYC Sailing School

Our Annual Sailing School will be held at Port Oliver Yacht Club for $45 for 4 half days of lessons starting on Saturday April 29th from 9-12 noon each Saturday and continuing through May 20th. The lessons will include parts of the boat, basic knots, and basic sailing techniques and also some sailing on beautiful Barren River Lake. Come out, check out the club and see what sailing is all about.  For more information or to enroll please call 270-681-1963 or email at poyc.info@gmail.com.  Our yacht club is located at the end of Yacht Club drive across from “the Landings” at Barren River Dam.

The Blessing of the Fleet! Saturday April 29th

The Blessing of the Fleet

The Blessing of the Fleet will be at 12 noon this Saturday April 29th. This is the official start to our sailing season. Please join us as we bless our boats, raise a glass to the memory of departed friends and toast to this our 51st year. Please RSVP to our Social Chair Leah McMurtrey by April 24th – So we know how much champagne and food to buy.  Contact her at leahmc@glasgow-ky.com  or respond on the event page on our Facebook page.